
essential utensils
These are the most basic tools you’ll need to get started with electronics, whether you’re building a kit, or making your own circuits.
Soldering Tools
Soldering equipment is your first stop on the way to working with electronics. And it will pay for itself the first time you fix the connector on your walkman headphones instead of buying a new set! Takes some practice, but well worth learning.
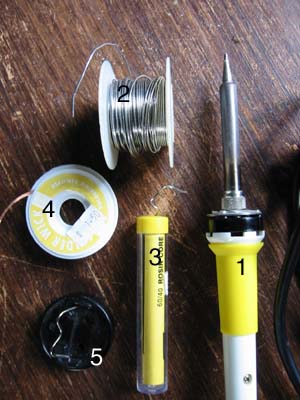
1. Soldering iron. Pay attention to the "tip" of the iron - the better quality ones have a slightly duller-looking metal coating on the very end, the last 1 cm or so (see photo). Irons where the tip is all one silver/chrome colour are ok, but don't last as long. Be sure to get one that is "grounded", i.e. has the larger (3-conductor) plug to plug in the wall. It should cost $/€ 10-15.
2 & 3. Solder. A lot of kits come with the yellow tube (3), but I find the solder is a bit too thick. You might want to buy a roll of thinner solder, like in (2). Solder contains lead, so wash your hands after using it, before eating or smoking. I mean, you'd have to really eat a lot of it to hurt you, but just to be safe. The lead doesn't really go into the smoke from soldering, but still you should avoid breathing the smoke or getting it into your eyes, because it can be irritating. An electric air-cleaning fan with a charcoal filter is nice to have.
4. Solder Wick. Not absolutely necessary, but helps clean up when you've put too much solder somewhere. It's a roll of braided copper, that when heated will suck up excess solder. Alternatively you can use a "solder sucker", a spring-loaded vacuum tube, not shown.
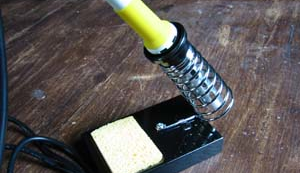
5. Soldering Iron Stand. This is a small portable one, but the iron easily falls off and burns holes in the table and floor. I recommend the one pictured on the right instead. Note the yellow sponge; you put a little water on this and use it to wipe extra solder from the iron. Make sure you don't put the wet sponge into your toolbox, or your tools will rust.
Hand Tools
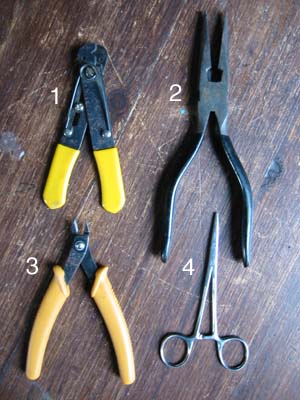
1. Wire Strippers. To get the plastic coating off wires. You can adjust the screw for the size of the wire you're using, but eventually you'll learn to feel your way through the plastic without cutting the wire, and you don't need the screw anymore.
2. "Needlenose" Pliers.
3. Side Cutters. Although you can cut wire with the strippers (1), they tend to bend the end of the wire, making it difficult to insert into holes. I highly recommend the ones shown here. They have one side ground flat, so you can cut wires off very close to where they are soldered.
4. Surgeon's Clamp, very handy for small work.
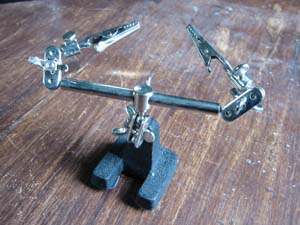
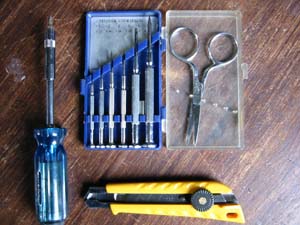
Below is a regular screwdriver, a set of small "jeweler's screwdrivers”, and a pair of scissors. A sharp utility knife is often is the best way to remove plastic insulation from larger wires. Finally, a “helping hand” is not only handy and helpful, but absolutely indispensable for soldering wires to connectors. Trust me, you need one of these.
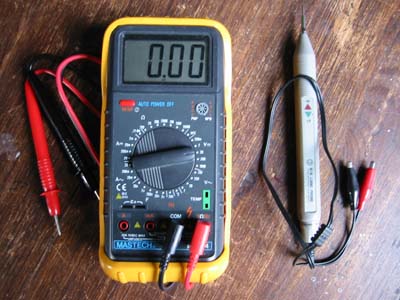
Multimeter and Logic Probe
A multimeter (on the left) is Absolutely Essential, perhaps even more so than a soldering iron. Measures voltage, current, resistance, continuity, and so on. The one shown here is a bit fancy (also measures capacitance, frequency, temperature, etc.) but you can get smaller ones for $/€15 or so.
On the right is shown a "logic probe". Not really essential, but nice to have if you can afford it. Shows the difference between "plus", "minus", and "not connected"; something that's not always easy with the multimeter. Especially useful when working with microcontrollers.
The above tools are everything you'll need to build hobby kits, where all the parts and the printed circuit board is included. If you want to try building your own circuits, from schematics in magazines or on the web, or experimenting with your own designs, you'll need the following things as well:
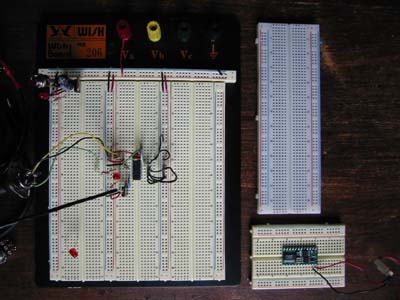
Solderless Prototyping Board, a.k.a. “Breadboard”
A plastic board with lots of holes in it. Lets you plug in different parts and wire them in various ways; changing connections and experimenting until you get it right. In my opinion, this is where all the excitement happens! Here is where you make mistakes and discoveries, put your theories to the test of reality, get thoroughly confused and confounded, and experience ecstatic joy when the thing actually works! Here is where you say "eureka!", and more importantly, "why the hell is that happening???"!
You can get them in different sizes, and of course you can get more than one. I often just leave my circuits running on a breadboard for an installation, if I don't have to build more than one. To start, I'd recommend the one on the top right, should cost $/€10 or so.
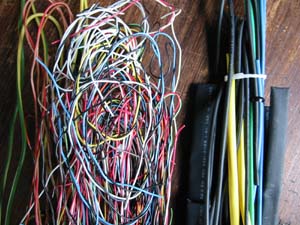
Wire, Heat-Shrink Tubing, and Clip Leads
On the left is a bunch of multi-coloured wire, the kind that is solid, one single wire; not the more flexible stranded wire (lots of little tiny wires making up one wire). You need solid wire to put into the breadboard. Stranded wire is also useful for connectors and things, but it doesn't work well in the breadboard. If you have the choice, the size should be 22 or 24 AWG or something like that. Mostly I get my wire out of old telephone systems and so on, but you have to hunt a bit for that.
To the right of the wire is a selection of "heat shrink tubing", which comes in various sizes and (sometimes) colours, but often just black. You put it over a wire connection you've soldered, heat it up with a lighter, and it magically shrinks to cover over the connection, protecting it from touching anything. Of course you can also use tape to do the same thing, but after a little time it gets sticky, goopy, and disgusting. Never put sticky tape on wires. I really hate that.
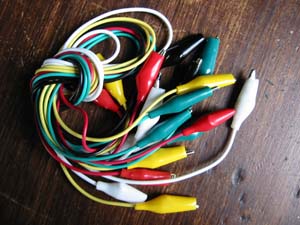
On the right is a set of clip leads. Very useful for making temporary connections on/off the circuit board, to batteries, and things when you don't have time to solder. - about $/€ 2.
DC Adapter and 5-volt Regulator
Here we have a common AC/DC adapter (transformer), that gives you various voltage outputs and connector types. You can get a cheap one at a discount shop, for $/€ 3 or so, which is fine for many things, but it's nice to have one that gives more power in case you want to run small motors and so on. The cheap ones are rated around 300mA of current; the one shown here gives 1000mA but might cost $/€ 15 or so. Recently there is a new kind on the market called a "switching" power supply. It looks very similar, but gives a higher current rating (1000-2000 mA, or 1-2 A) in a smaller and much lighter package. The switching supplies (usually) work with both 110 and 220 volts, great if you travel.
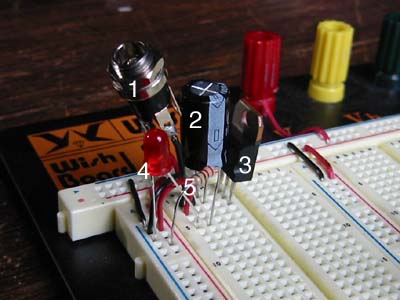
The picture on the right shows one way to connect power to the solderless breadboard. These parts should perhaps be in the "common ingredients" page, but I install them on my breadboards fairly permanently, so I think of them as "equipment". Many digital logic circuits run on exactly five volts, which is not provided by the DC adaptor. So here you see:
1. the connector jack to plug the DC adaptor into. Bring your adaptor to the store, so you can check that the plug fits! There are several different sizes.
2. a filter capacitor, about 1000 mF or so, rated at least 16 volts.
3. a "7805" five-volt regulator.
4. an L.E.D. light to show the power is on.
5. a 220 ohm resistor for the L.E.D.
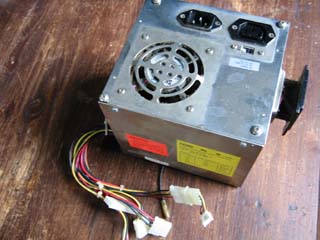
You can also use a power supply from a computer. It’s already regulated to 5 volts, so you don’t need the regulator circuit above. It gives you five and twelve volts, and a LOT of current! For example, while the above adaptors might give 300-1000mA, this will give you up to 20,000mA (20A). Great for running larger motors and giant robots. Sometimes these don't seem to work when not connected to the motherboard of the computer, and will require a light bulb or large resistor on the 5v supply. The ones I've found in Europe seem to have less of a problem with this. On the other hand, many of them have a switch for 110/220 volt operation, which is great if you want to take your work across the ocean without worrying about electricity supplies.
Note that the ground (black wire) is often connected to the AC mains ground. That means, for example, that you can’t put two 12-volt supplies together to get 24 volts, the way you can with a transformer.

That's the basics of the tools that you'll need for sure. But there are many more - and more expensive! - things that you'll find yourself wanting. For example, an Oscilloscope is a truly wonderful device. And a frequency counter, logic analyser, function generator, variable "bench" power supply, and so on and so on. But first you’ll want to get some parts.